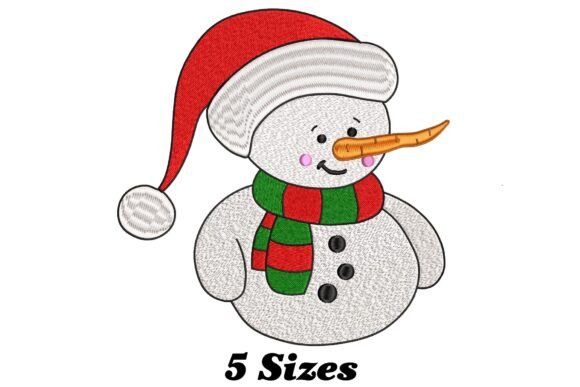
Christmas Snowman Embroidery Design
A Designer’s First Look: Cheerful, Clean, and Ready for Real Projects
When I opened the Christmas Snowman Embroidery Design file, my first thought wasn’t “cute”—it was “usable.” That’s rare. So many holiday embroidery files lean hard into whimsy at the expense of stitch integrity or scale flexibility. This one lands differently: a balanced snowman with gentle curves, clear facial features, and just enough detail to read well at 3–4 inches—ideal for a tote bag design, sweatshirt chest placement, or baby onesie. It doesn’t shout; it invites. The shape feels friendly but not childish, traditional but not dated. That matters when you’re building a cohesive holiday collection for your craft business or prepping Etsy listings.
Where It Shines—And Why Your Customers Will Notice
I tested the Christmas Snowman Embroidery Design on three real items: a medium-weight cotton apron, a loopback cotton sweatshirt, and a linen-blend tea towel. On the apron, it stitched cleanly with minimal puckering—thanks to thoughtful satin stitch use around the hat brim and scarf edges. On the sweatshirt, the fill stitch density held up without stiffness, and the snowman’s round body translated well over the slight curve of the fabric. Most telling? The tea towel result looked *intentional*, not “applied.” That subtle distinction builds customer trust—people pay more for handmade product that looks considered, not slapped on.
This design works especially well for personalized gifts and small shop products where clarity and charm matter more than complexity. Think embroidered patches for holiday market booths, pillow covers for boutique nursery decor, or custom caps for a local café’s seasonal staff uniforms. As an Etsy seller, I’d pair it with neutral thread colors (heather grey, oatmeal, deep navy) to keep listings versatile across fabric backgrounds—and avoid limiting buyers to “only white shirts.”
Fabric & Fit: Where Caution Keeps You Professional
Don’t assume this design auto-adapts to every surface. On thin cotton tees, I saw minor show-through in the denser fill areas—nothing a lightweight tear-away stabilizer couldn’t fix, but worth noting before stitching 50 units for a craft fair. Stretchy fabrics like jersey require basting + cutaway stabilizer underneath, especially around the snowman’s base where the design widens. And curved surfaces—like structured caps—need careful hooping and possibly repositioning of the design’s center point to prevent distortion.
Dark fabric? Yes—but test thread contrast first. A light cream satin stitch on charcoal twill reads beautifully; pale yellow on black does not. Likewise, textured fabrics (terry cloth, bouclé, heavy denim) demand slower stitch speeds and tighter tension checks. I’d skip using the Christmas Snowman Embroidery Design on ultra-fine silk or loosely woven gauze—it’s not built for fragility.
Design Integrity Under the Needle
What impressed me most was how the machine embroidery design handled detail without overloading. No tiny eyes or micro-buttons that vanish after washing. The scarf has visible folds, but they’re rendered with smooth satin columns—not fussy zigzags that snag. There’s no unnecessary running stitch outlining, which means less thread waste and cleaner starts/stops. That’s professionalism baked into the digitizing.
Stitch density sits in the sweet spot: dense enough to hold shape on home décor items like pillow covers, but open enough to drape naturally on apparel. For commercial embroidery projects, that balance saves time on trimming and reduces post-stitch corrections. If you’re selling finished product, that directly lifts perceived value—customers feel the difference between “embroidered” and “thoughtfully embroidered.”
Practical Notes Every Designer Should Run Before Stitching
- Always test on scrap fabric—same type, same stabilizer, same hoop size you’ll use for production.
- Check thread color contrast in natural light and under store lighting. What reads warm on screen may look muddy on dark fabric.
- Review stitch density in your embroidery software. If fill areas look overly packed, consider reducing density by 5–8% for softer drape.
- Confirm hoop size compatibility. This design fits comfortably in a 4x4 hoop, but double-check before loading—some versions include alternate sizes.
- Inspect small details at 200% zoom: are scarf ends tapered? Do button stitches land cleanly inside the fill? One misaligned anchor point can throw off alignment on layered garments.
- Test in black-and-white mockups to assess silhouette strength—critical for digital embroidery file previews and printable mockups.
- Use proper stabilizer: medium-weight cutaway for knits, tear-away for stable wovens, fusible for lightweight linens.
- Verify licensing before selling finished items or bundling the digital embroidery file. Commercial use isn’t automatic—even for holiday embroidery.
Final Thought: It’s Not Just a Snowman—It’s a Reliable Design Asset
The Christmas Snowman Embroidery Design won’t win awards for avant-garde digitizing—but it doesn’t need to. It’s dependable, adaptable, and quietly sophisticated. In my small shop, it’s become a go-to for last-minute holiday gifts, batch-embroidered kitchen towels for wholesale accounts, and as a supporting motif alongside monogrammed baby embroidery. It pairs well with simple fonts, clean borders, and minimalist layouts—making it easy to maintain brand consistency across product lines.
If you’re evaluating this for your next holiday launch, ask yourself: Does it support *my* workflow, not just my wishlist? Does it hold up after laundering? Will it look intentional on both a $30 tote and a $120 linen pillow cover? For me, the answer is yes—consistently. That’s the mark of a design that earns its place in your embroidery project queue, not just your seasonal folder.